
Many consumer and industrial devices ship with built‑in debug interfaces that simplify development and field support. When those interfaces remain reachable and unsecured on production hardware, they also provide convenient footholds for anyone having physical access, including in a compromised supply chain scenario. The devices under study are not industrial controllers, but the patterns observed, such as the absence of a secure boot and an accessible bootloader prompt, are common across many embedded products, including ones deployed in OT environments.
In recent analyses of Novatek SoC based devices completed by the Nozomi Labs team, those common design choices were present, but the behavior was unexpected: interaction with the bootloader was possible, but as soon as the kernel started, the system went completely silent, meaning no console, no logs, nothing. This article walks through how we went from that “everything looks right, but nothing talks back” moment to recovering a fully working debugging console exposed over UART on Novatek SoC-based devices.
From a research perspective, the interesting part is not a new hardware vulnerability, but the path we followed to restore a usable console. By combining the analysis of the kernel customizations and the old-fashioned trial and error approach, we turned a “mostly dead” debug port into a fully interactive shell, entirely at runtime and without permanently modifying the device. The rest of the article showcases that path step by step, from the initial “why is it not working?” moment, through kernel analysis, to the final boot with patched argument.
Initial analysis
Obtaining a shell on the system was a primary goal for convenience as it greatly simplifies reverse engineering activities. In these cases when a low hanging vulnerability is not found, the usual process is to disassemble the device and identify components on the PCB, locating test points or debug ports. The analysis proceeds from the easiest and least invasive techniques. For example, possible debug ports are checked before attempting more intrusive methods such as desoldering the flash memory IC.
In this instance, the debug port was easily identifiable, and after soldering wires to the PCB and checking the baud rate of the serial connection, a USB to UART TTL adapter was connected for interaction.
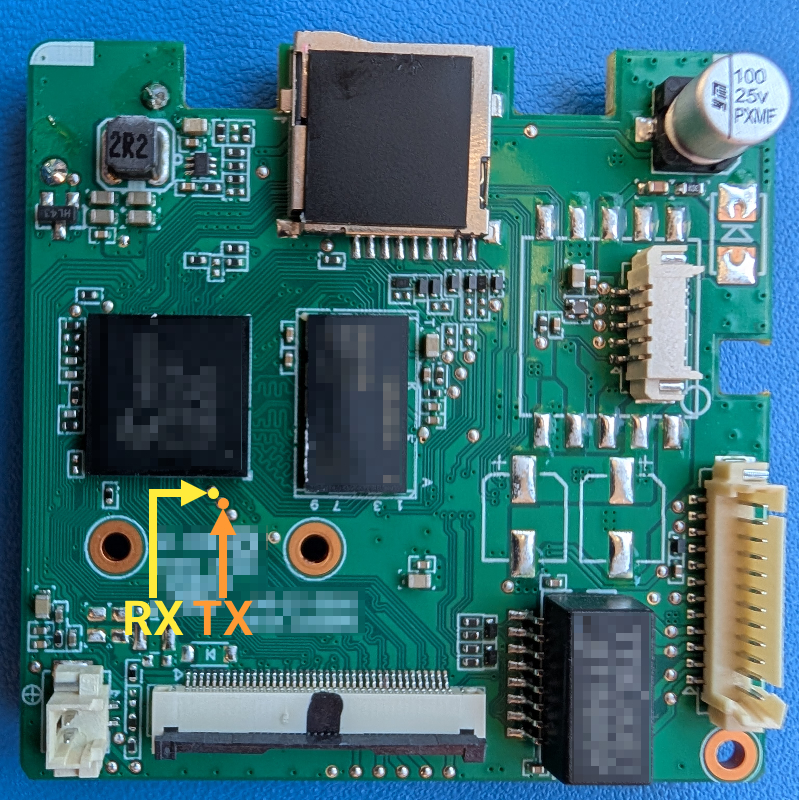
Once the setup was complete, we powered-up the device and the serial console came to life. We saw the expected boot messages and Linux kernel initialization… and then, nothing. As soon as the kernel took over, the output went dead and the device stopped accepting input. These are classic signs that the console was either disabled or misconfigured after boot. By inspecting the logs, we spotted that the SBL (Secondary Boot Loader) was U-Boot and a message appeared prompting the user to press CTRL + C to stop the boot process.
After a reboot, CTRL + C (0x03 in case of scripting) was sent to interrupt the boot process, and the system showed an interactive prompt for the bootloader shell.
The next step was to dump the boot arguments from the bootloader environment. These environment variables, which you can read and modify with the env command, typically hold boot configurations and the Linux kernel parameters. Specifically, the init argument could be replaced to run a specific executable as the first process and the console parameter can be added for specifying where kernel logs are printed.
In our case, the kernel console parameter already looked correctly configured, which didn’t match the “everything goes silent after boot” behavior we were seeing. Datasheets for similar Novatek SoCs indicate support for up to three UARTs, so we tested alternatives by switching the console to ttyS1 and ttyS2, albeit with no results. Then, we modified the init argument to /bin/sh and although this did not change the output, the device was no longer reachable over the network, suggesting that the system was not booting properly and that the change had some effects.
A blind approach could have been possible. For example, we tried crafting an init parameter to spawn a remote shell, but after wasting some time on it unable to craft working one-liners, we decided to further investigate the issue.
Identifying the issue
At this point, we switched our strategy and decided to dump the entire contents of the flash using the U-Boot shell. As stated earlier, least invasive methods are preferred first. In this case, we took advantage of the nand dump command to dump in hex string format a page of the flash at a specified address. This process is tedious and slow: as the command only dumps a page at a time, a script must be written for automating the process. However, we also hit the bottleneck of the speed of the serial connection as the highest supported baud rate was 115200. This meant that the full dump of a relatively small flash memory (around 32 Mb) required hours. This was aggravated by the fact that by using nand dump, we effectively waste bandwidth since it outputs the content as hex characters.
To clarify, UART in this case follows the 8N1 configuration, meaning 1 start bit, 8 data bits, 1 stop bit, so in the ideal case to send/receive 32Mb it would take:
But as nand dump outputs a page (2048 bytes) in the following format:
This means that a page using this method will take 7590 bytes:
If we plug this ratio in the previous calculation we get:
From the boot logs we already knew the flash layout, including that the FDT (Flattened Device Tree) resides at offset 0x40000. The next logical step was to inspect the device tree and verify whether it described the UART devices.
The device tree is a way of describing the hardware. It is used by the boot program to initialize some hardware components and then it is passed to client programs (e.g. SBL, OS) so that they can correctly use the hardware. It comes in the form of DTB (Devicetree Blob) which is the binary encoding of the data, and the DTS (Devicetree Source), which is the human readable textual representation. It is possible to convert data from one format to another by using the dtc software.
The fact that we had evidence of the three UART devices being described in the device tree was reassuring but suggested another possibility: the issue might lie in the kernel itself. It could have been compiled without UART driver support, or the device could have not been initialized correctly.
The kernel was easily extracted from the flash dump, using the same process as done previously, since we knew the offset on the flash from the bootloader logs. Alternatively, it was possible to employ file carving utilities, the most famous being binwalk, that identifies and extracts different file formats. Then, using vmlinux-to-elf, we converted the kernel image into an ELF file with symbol information that is suitable for static analysis.
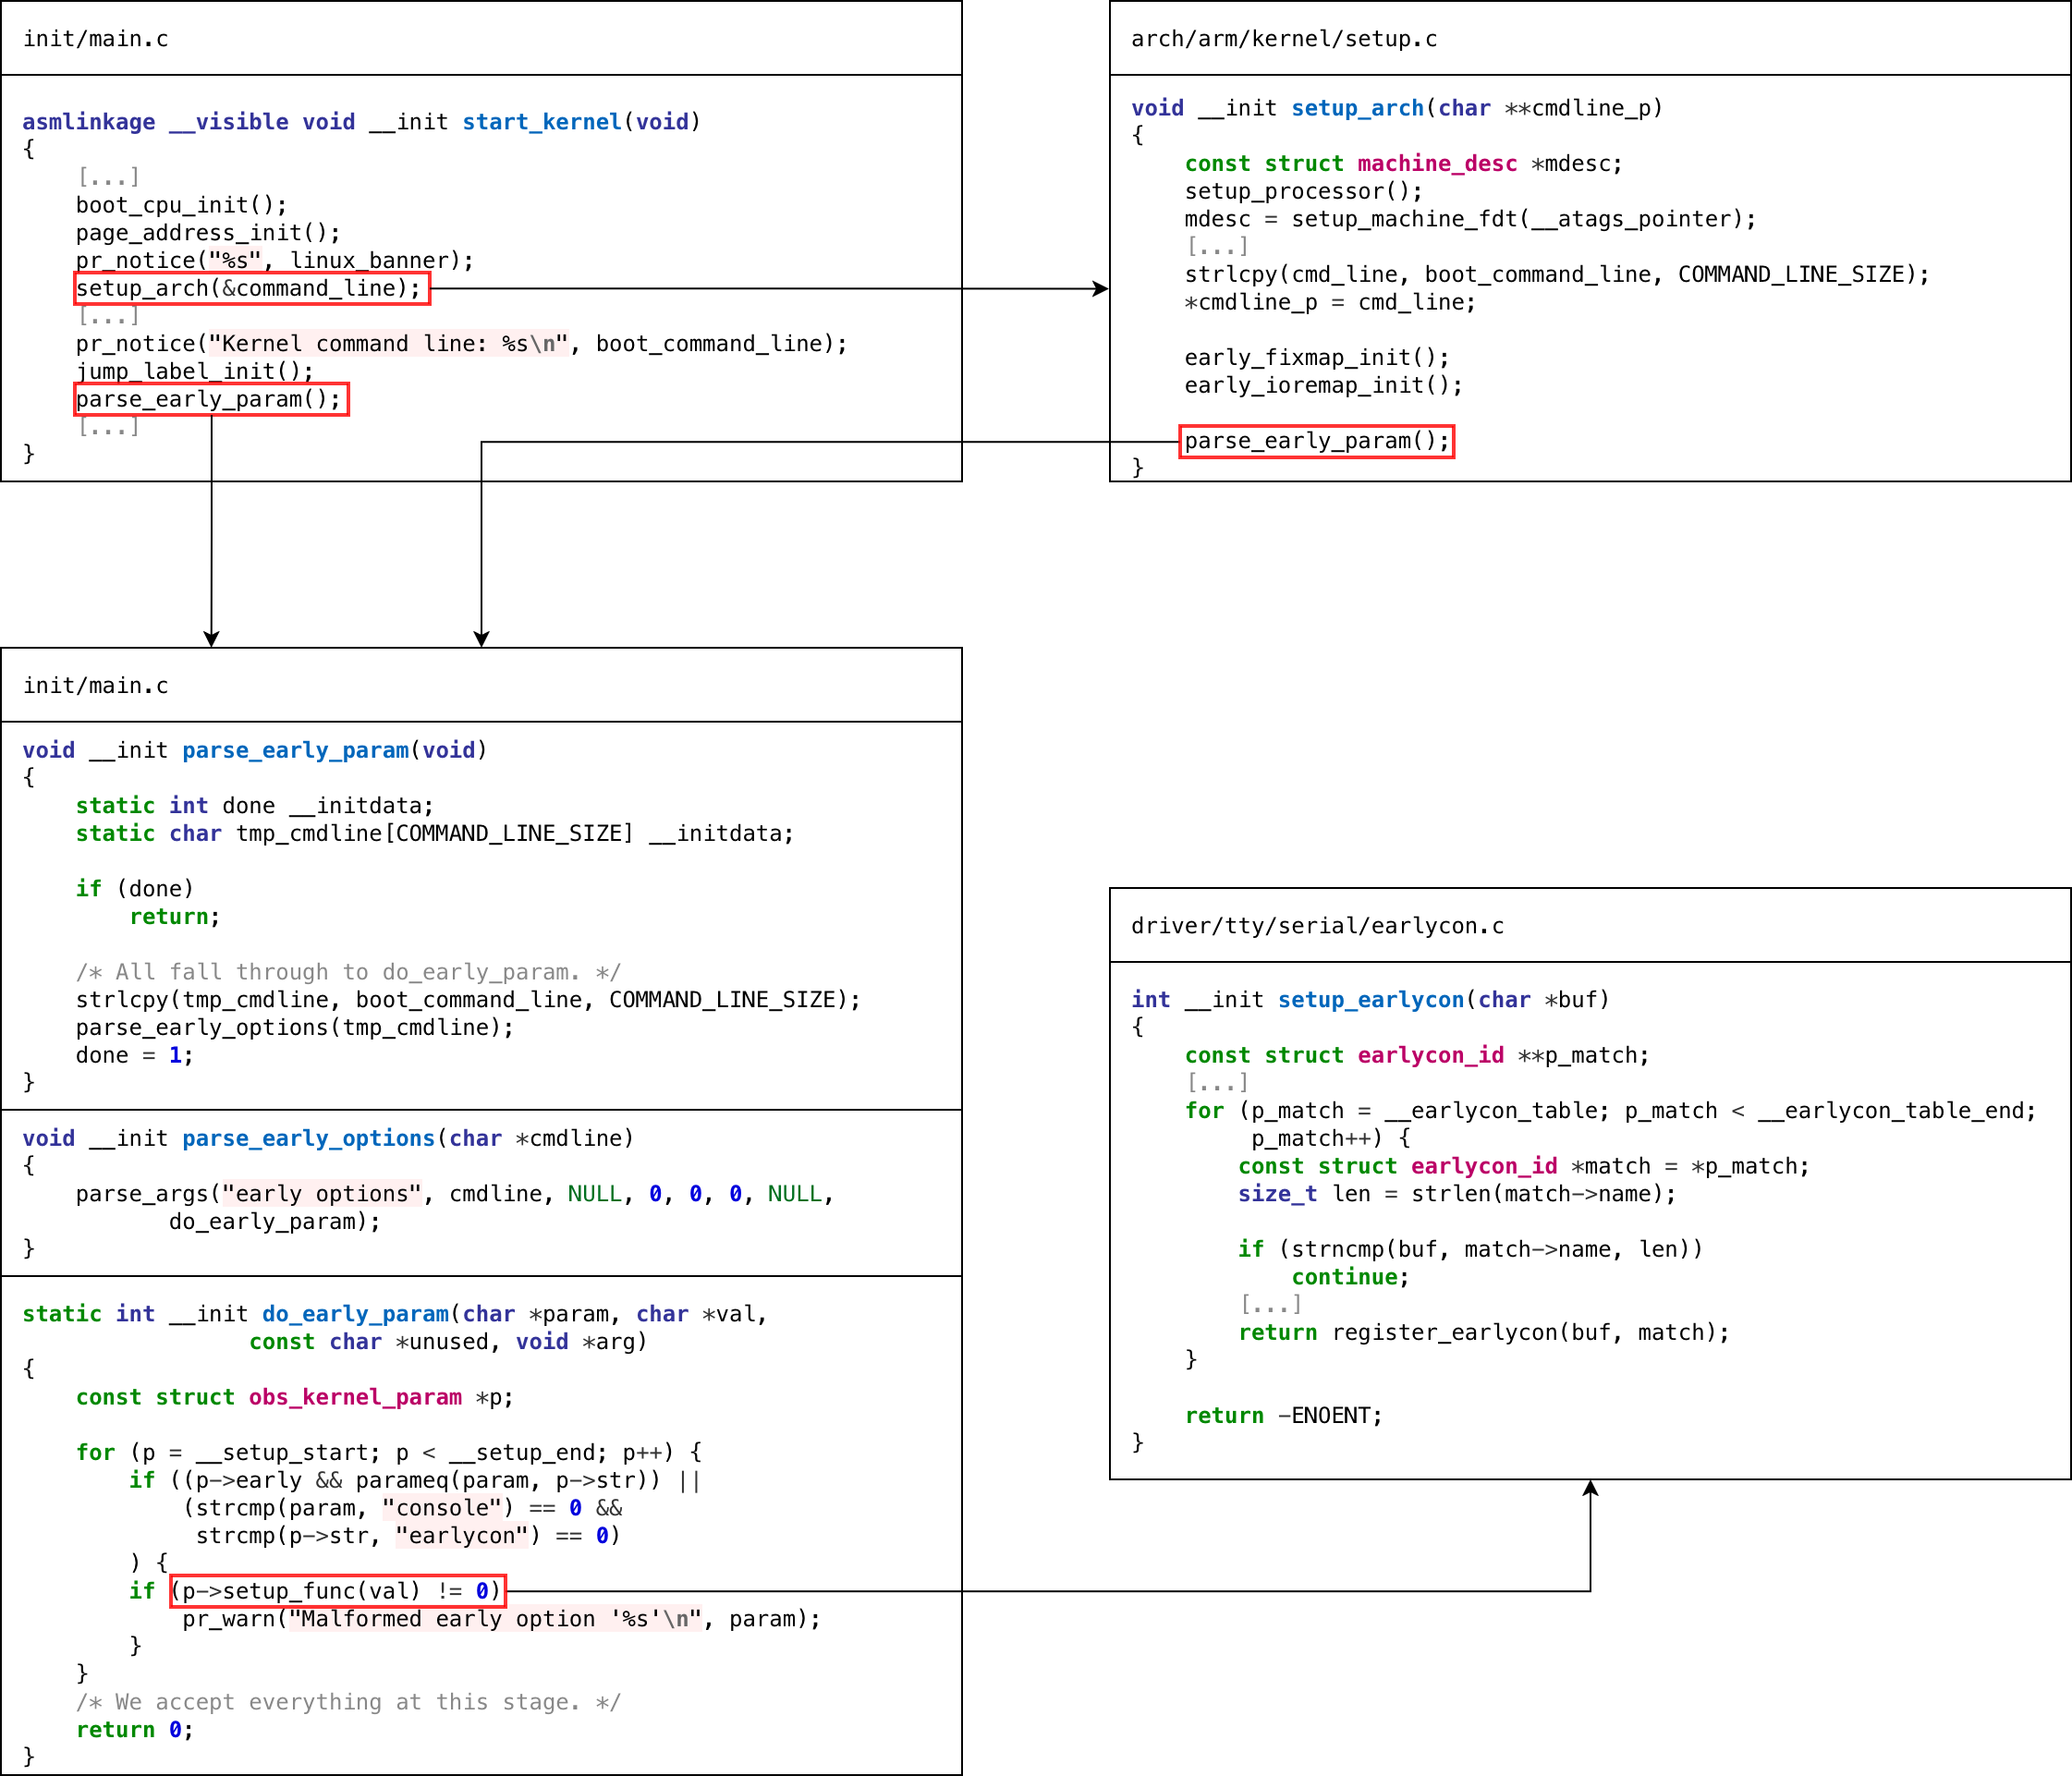
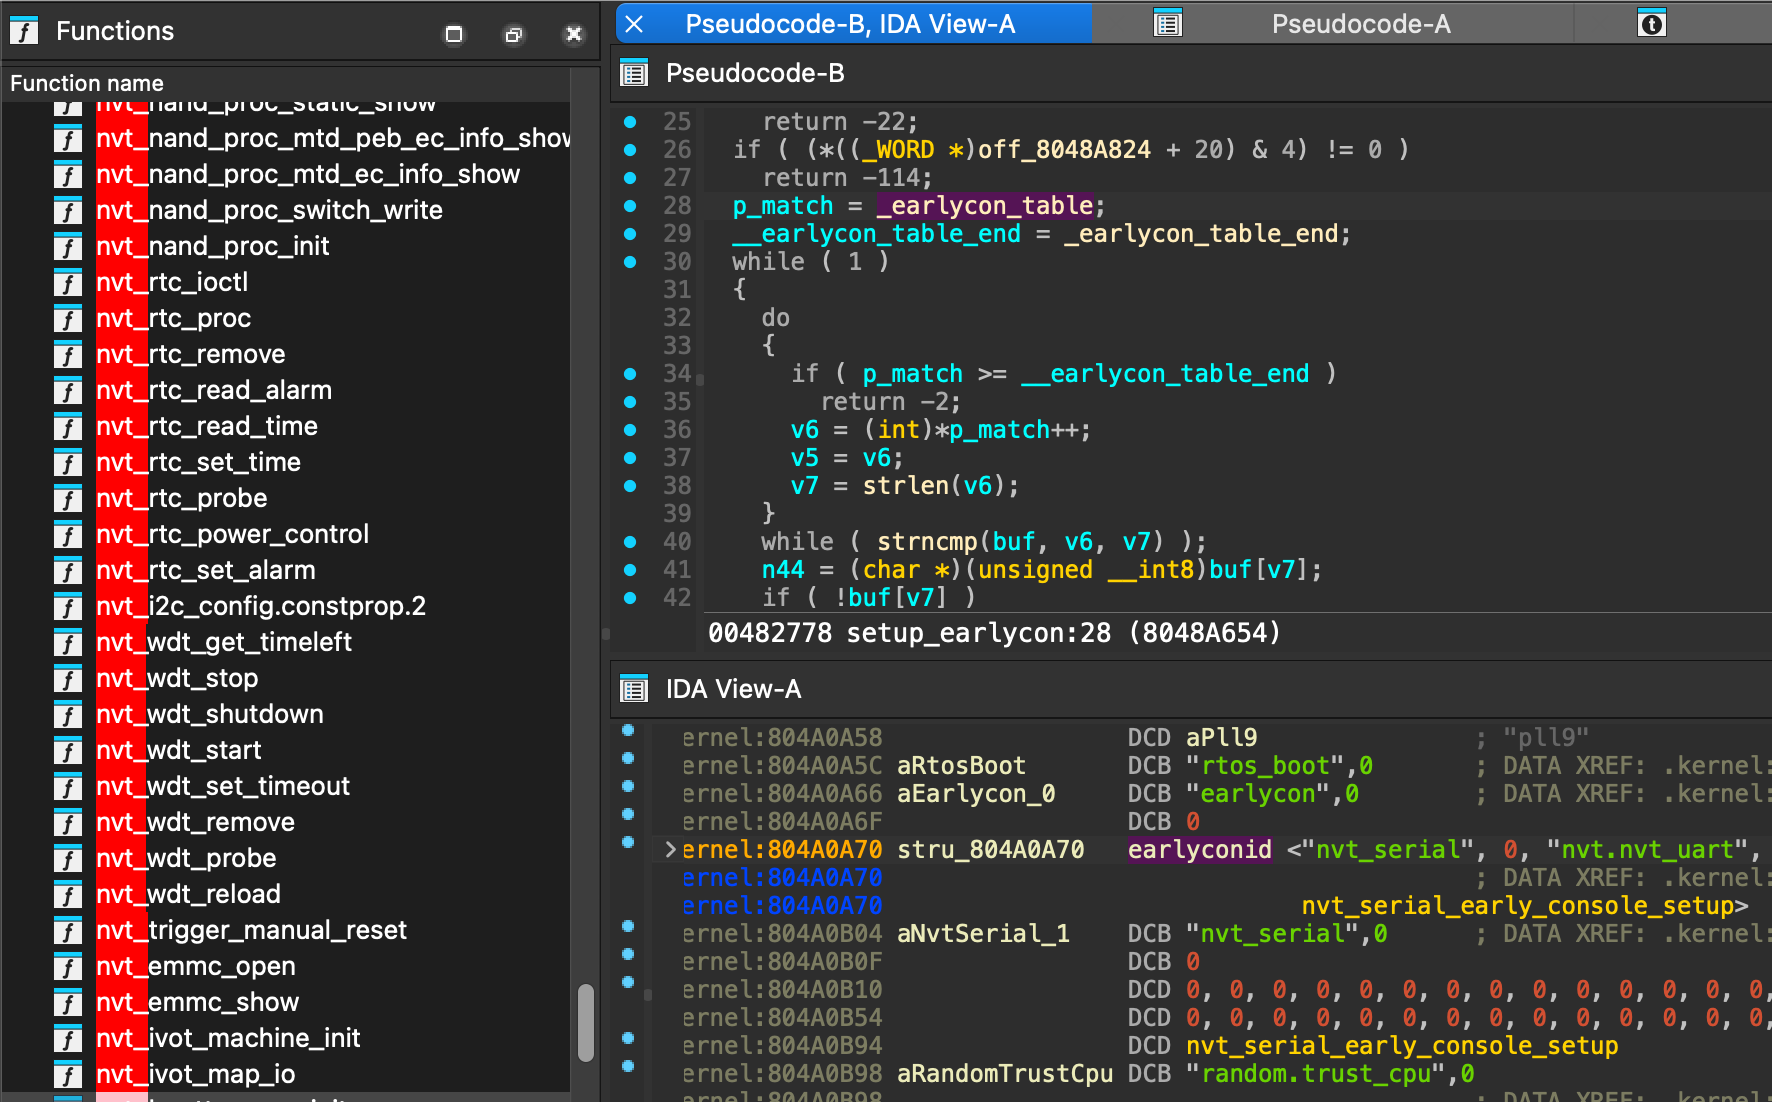
We started analyzing it and comparing it against the source code of the mainline Linux kernel. Apart from the expected Novatek-specific functions, nothing obviously broken or missing jumped out at first glance. One kernel parameter that stood out in the context of serial output was earlycon. It was interesting because it is an early param, meaning that the kernel evaluates it in the initialization process, specifically at the beginning of the setup_arch function and after, in the start_kernel function. Looking at the implementation of setup_earlycon, the behavior was straightforward: the function walks earlycon_table to find a matching device, with each earlycon_id providing a name and a setup function. Examining setup_earlycon in IDA and dumping the table showed that only a single earlycon_id was registered: nvt_serial.
In the bootloader, the bootargs variable was updated to include “earlycon=nvt_serial,0xf0290000”, specifically 0xf0290000 is the memory mapped address of the device as stated by the device tree that shown previously.
This enabled partial kernel output logs as the device was deactivated shortly after; the same behavior was produced using console parameter.
Several other Kernel parameters were tested, including the use of keep_bootcon which prevents the deregistration of the boot console. However, none of them changed the result. This led to another hypothesis: after device initialization, the console might stop working as the device tree does not specify nvt_serial as a compatible driver.
How it was solved
To test this idea, the device tree was modified by adding nvt_serial to the compatible field of the first UART device, converting the device tree to flattened format using dtc. The updated FDT could then be loaded into memory either by using tftpboot or by creating a script that writes into RAM word by word using mw command.
Booting Linux with console=nvt_serial0 showed that everything was working correctly.
At this point, reinserting init=/bin/sh with the current configuration seemed sufficient, but this triggered a Kernel panic.
After a series of attempts, the following argument was used.
This long shell command does the following:
- Starts
linuxrcin background - Waits 60 seconds for the network stack to be set up
- Outputs a URL using dc
- Downloads a bind shell in tmp and runs it
- Empty infinite loop in case the bind shell exits unexpectedly
Step 3 is a workaround as inserting dot characters and back slashes caused a kernel panic. While dc is a calculator software, it can be used to convert hex strings to ASCII characters.
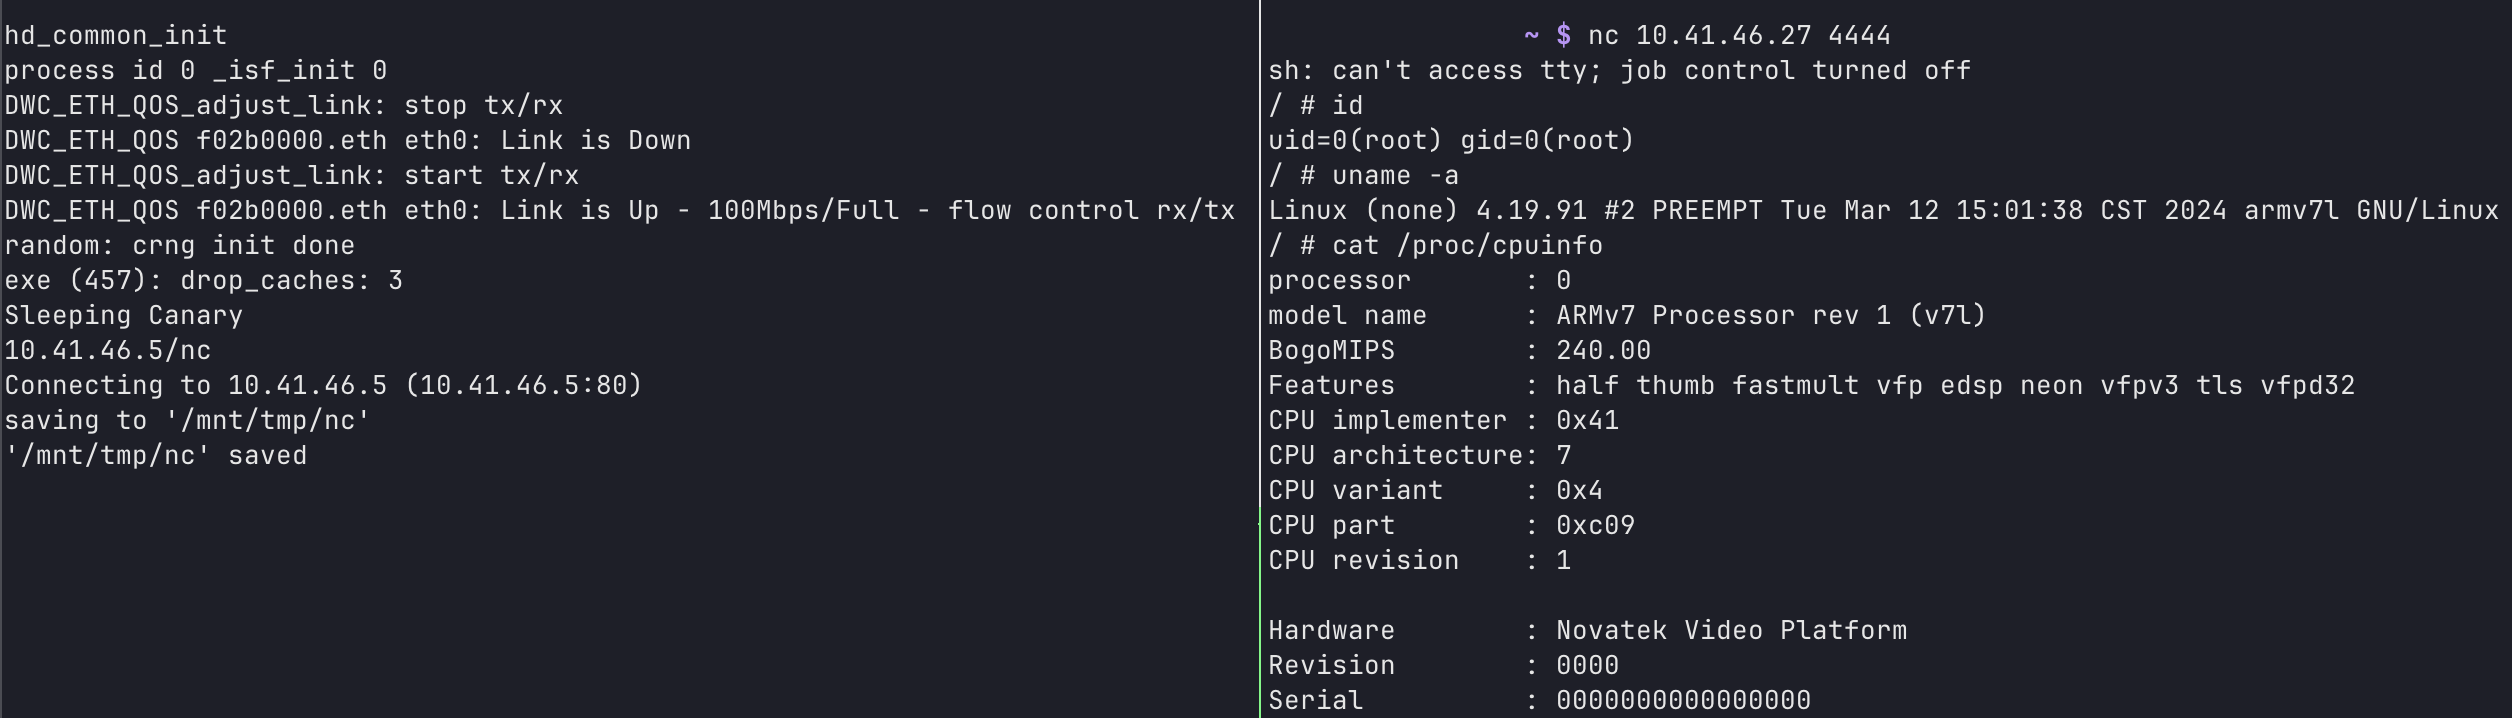
This enabled a full working bind shell for going forward in the reverse engineering process! Hopefully this write-up proves useful or provides inspiration in similar cases.
Appendix
Flash dump script
This script was used to dump the contents of the flash, in order to use it, make sure that the bootloader shell is in the prompt state without characters already inserted.
Example of usage “python3 dump.py /dev/ttyS0 115200 10 dump.bin".


.webp)


